Happy Friday everyone! I have gotten a few questions on how I made the background on the following card so I decided to make a little tutorial. I hope you enjoy! Please don't hesitate to let me know if you have any questions or any steps are unclear. :)
Here is the finished card:


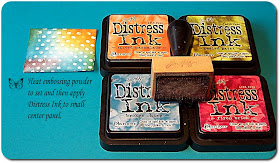
This next step is shown on black paper so you can see the technique. This is what you would do with your small, white center panel that you have just sprinkled with white embossing powder (in the previous step).
*Before heating the embossing powder, use a paint brush to brush away sections of the embossing powder for a distressed look.


Finally, add stitching, butterfly, and adhere panels.
Thanks again for stopping by! See you tomorrow with our next "Inspired by..." stamper!


SO beautiful Jill! Thank you for sharing some of your genius with us! I am in love with your ink expertise!
ReplyDelete:-)
So helpful...I have been intimidated by all the inks but think I'll have to give this a try!! thanks Jill!
ReplyDeletegorgeous card! love your distress and emboss resist technique! thanks for the tutorial, Jill! =)
ReplyDeleteSuch a stunning card and to see all the work you put into it makes it just that much more stunning! I really want to try deistressing a bit more your making me like it that much more!
ReplyDeleteLOVE your picture tutorial! So clear and precise and the pictures are so nicely done! THANK YOU for taking the time to show how you made it! Truly awesome, Jill!
ReplyDeleteGreat tutorial Jill,,, way to go to get onto Twitter
ReplyDeleteThankyou Jill for the awesome tutorial. Very clear and easy to follow.I love using distress inks and just received the dots stamp..so off to my craft room now!
ReplyDeleteGreat tutorial!!!! Thank you so much for the inspiration Jill! WOW!
ReplyDeleteThank you so much, Jill, for sharing your techniques!! It is so fun to see how its done! I really appreciate your talent! Hugs! :)
ReplyDeleteThanks Jill for this tutorial. I love distressing and you are great at it.
ReplyDeleteIsha
Thank you, Jill, thanks!!!! ^^ ohh i want to try right now!!! ^^
ReplyDeleteHi, Jill! Thanks for that tutorial! That card really was a stunner! Amazing things you can do with that distress ink and how much work you put in a card! Your cards are always finished up to perfection!
ReplyDeleteGreat tutorial Jill - thanks for sharing. :)
ReplyDeleteLove the card, and the tutorial is really helpful. Thank you!
ReplyDeletethat's it??!! just flicks of water!!??
ReplyDeleteWOW. i may never stamp clean again. :)
i LOVE this card, and i'm pretty sure i was one of the commenters who said, "how did you DO this!!??"
thanks so much for sharing.
can't wait to try my new "jill foster" technique!! ;)
You're BRILLIANT!!
ReplyDeleteI'm totally in love with this card of yours!!!! Thanks for the explanation about each step! It's perfect!
ReplyDeleteThank you, Jill! I love your idea to brush off sections of the embossing powder before heating - that gives a lovely effect!! Great tutorial!!
ReplyDeleteThis is a great help, thanks :)
ReplyDeleteGORGEOUS! Thanks for the tutorial.
ReplyDeleteThanks for this super tutorial with your inks, yumm!!! Just love what you did with the front panel and making 4 different colors out of it, so pretty!
ReplyDeleteJill, you are such a creative genius...thanks for this little glimpse into your process. I think I'll be trying this today!
ReplyDeleteJill, I love everything about this card, but especially how u used the orange color above the butterfly to draw the eye upward. What an eyecatching detail!
ReplyDeleteDid you use 2 different stamps on the background for the small white piece?
Great tips, Jill!
ReplyDeleteThank you so much Jill!
ReplyDeleteI love your tutorial!
Hello Jill!
ReplyDeleteI did give it a try, if you would like to see the result!
http://frularsenskort.blogspot.com/2010/03/inspired-by-inspired-by.html
I think you make the most amazing colors, and I love the "pow" it gives! Hope you understand ;)
thanks for the tutorial,
ReplyDeletefree internet jobs
I am so in love with this card. I look at it pretty much every second day! Can't get enough of it. I'll have to make my own, sometime - thank you for the tutorial.
ReplyDeleteYou do such lovely work with distress inks!!